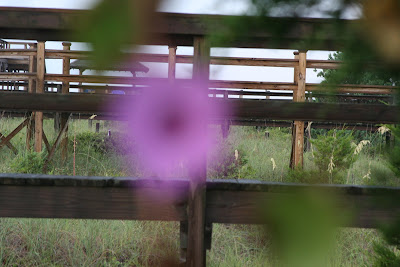
Two very important differences between a point and shoot camera and the SLR camera such as the Rebel (my camera) is the ability to tell the camera where to put the focus of the picture and your ability to choose the depth of field through your aperture settings. (IE - if a picture is focused on one subject with a blurry background or if everything is in focus.)
A p-a-s decides where to focus the picture and usually everything will be in focus. With a SLR, you have the ability to make those choices and override the camera's internal functions.
Take these two pictures for example. They are the same exact subject and the settings on the camera were the exact same. (Taken in Aperture Priority, f/8, 1/125 of a second shutter speed, ISO 400 and taken at 115 mm using my 28-135 lens with no flash fired.)
In photo A, I set the focus on the railings in the background. In the second picture, I set the focus on the flower. The difference is obvious.


You can only use manual focus with the creative settings (ie - on the Rebel it's the settings to the right of the automatic setting.)
To set it on the Rebel, select one of the creative setting functions (P, AV, TV, Manual, AutoDep), and select the AF botton on your camera (it's the small button on the right of the top back of the camera. It has what looks like a tic-tac-toe board over it.)
You will then see two brackets that look like this: [ - ] in your viewfinder. (Note that the - may be positioned differently than above.) You can then use your wheel located on the top front right of your camera to move around the focal point. If you select the one where all points show, then you're telling it to select the focal point.
This allows you the ability to focus the pictures where you want it to be. It's also useful when you're trying to get something distracting out of the picture (either in the foreground or the background.)
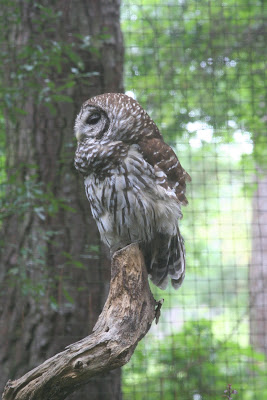
Take these for example:
I was shooting this owl but there was a net in the way. I just changed my focal point and was able to blurr the net.
Note that if you tried to do this with a point and shoot, the camera would pick up the nets and it would look like a line down your picture. I know because I've tried it. (settings: TV, f/8, 1/50 shutter speed, IS0 800, 112 mm with a 28-135 lens, no flash fired.)

For this picture, I was using my 50 mm which is a very fast lens. The focal point is on the stars in the lower right side. Settings: AP, ISO 400, f 2.5 1/30 shutter speed, 50mm, no flash fired.

For this one, it was taken about 8:45 at night. The focal point is the flag with the beach and sand blurred in the background. Settings: shutter priority, f/8, 1/50 sec, ISO 800, no flash fired, taken with my 28-135 lens. Note that I usually do not use a speed as high as 800 but I didn't want to fire the flash and this was the only way to get enough light to take the picture.

Here are a few other examples.
So, that's it. I hope that this was helpful to those that are trying to learn their camera. And, don't forget that you can set your camera back to the default. So, take your camera off of automatic and change the settings. You can always change it back to the default settings. Have fun! :)


2 comments:
Keep the lessons coming!
Becky W
Glad you like them because I am writing them for you. :)
Post a Comment